Tuesday, March 26, 2013

Review: Tony Moly Expert Triple BB Cream

In Korea, I'm always bombarded with the countless choices for beauty and skincare products. As one of the top cities in the world famed for its beauty, you could be sure to expect that the beauty industry would also be intensely competitive. 

One of the brands that  have always stood out to me there was Tony Moly. I'm sure many of you have heard of Etude House and Missha, since these brands are more popular in the states. While the two brands I've named are definitely wonderful brands, when it comes to quality, affordable skincare, Tony Moly is one of my top choices. 

I have a tendency to shy away from using BB cream, since my skin tone is more on the light-medium side, I have a harder time finding a good match. Since I'm a huge fan of the brand, I figured that this would make a great product to review. 


So what exactly does the "triple" stand for? According to the Tony Moly Global Website, the triple function of this BB cream provides: 

Whitening 
Wrinkle Care 
Protection against UV Rays, SPF45 PA+++

"Red Ginseng extract helps regenerate the fibroblast and aggrandize the skin's immunizing functions. Organic Lavender Extract boosts to restore the damaged skin and Beta-Glucan substance protects the Langerhans Cell in skin, which gets easily deteriorated by UV Rays." 

"Usage: Apply this BB Cream to your face evenly and lightly after base make-up." 


As you can see, the product is fairly easy to dispense. It contains a pump and gives a decent amount of product. One to two pumps is generally enough, depending on how much coverage you want. 


This is two pumps of product onto my hand. At first, product comes out looking somewhat close to a light beige.


And here is the product after I tried blending it in to my skin. Upon first glance, it is clearly way too light for my skin and has a slight grey tinge. Don't worry, it does need a little time to oxidize and in no way is this going to look like how it actually does after it adjusts to your skin tone. 


After around five minutes, this is how it looks after it has oxidized on my skin. While it has definitely blended in better to my skin, it's still a bit too light. However, to best directly get the results of the product, I have demonstrated how it actually looks on my face. 


In this picture, I have my eye makeup and lips finished. I am wearing no face makeup whatsoever. My skin is more on the normal side but from time to time, it does get a little oily at the end of the day. My biggest problem are my pores and a little bit of skin color unevenness around my nose and eyes. 


Ahhh! I do apologize if my pores aren't exactly what you want to be seeing this close up. However, I wanted to demonstrate the before and after for this BB cream, just so you can gauge how its coverage performs. 


Now this is me with the BB cream applied with two pumps. The coverage is pretty decent and can be substituted as your tinted moisturizer. It does a fairly good job of covering my pores and evening out some of the redness around my cheeks and under the color under my eyes. The coverage is pretty dewy, which I definitely like. 


The only problem I'm really getting is that this isn't exactly the greatest match for my skin tone. While the finish looks nice and smooth, people may be able to tell the difference between my face and the rest of my body, which is a face makeup no-no. 


I had to add some blush and bronzer to bring some color back to my face. It still wasn't a perfect match, but it was a little better in making me look less pale. 

To test the staying power of the BB cream, I actually did a little working out at the gym to test its oil control and to see if the product would be able to withstand sweating. Surprisingly, it performed fairly well and most of it was still on my face despite me having ran a couple miles on the treadmill. After five hours from when I first applied it, I did experience a little bit of oiliness around my nose and cheek area, but it wasn't anything major. 

Pros:

  • Contains a high SPF, which is great for daily daytime use
  • Gives a really lovely dewy finish 
  • Has long lasting durability and will not melt off during strenuous activity 
  • Blends well after oxidizing 
  • Feels super light on the skin 
  • Good oil control for normal skin
  • Medium coverage that is buildable 

Cons: 
  • Not a good match for skin tones below fair or light-skinned 
  • Scent is fairly reminiscent of sunscreen (unless you're fond of that smell) 
  • May get a little oily after a few hours for those with oily skin

Overall, this is one of the better BB creams that I've tried. However, I think I'll stick to using this in the wintertime when my skin gets lighter. I know the US has been catching on to the BB cream craze over the last year and there are tons of products out there that can match a wider variety of skin tones. I just might have to check them out sometime. 

For the more fair-skinned people, considering the benefits, I believe that this would be a great product to have on hand when you don't feel like wearing foundation everyday. 

 Anyways, what did you guys think of this product? Do you have any particular BB creams that you would recommend? Let me know in the comments below! 

With Love, Tiffany 

Wednesday, March 20, 2013

Review: Diamond Lash Glamorous Eye Series

When it comes to going out and dressing up nowadays, I say forget diamonds, false lashes are a girl's best friend! I've gone through so many different brands of lashes, some have stayed in my collection for years while others have ended up gathering dust somewhere in a random corner of my house. 

However, for the past couple of months, I believe that I have definitely found a favorite. I already had super voluminous false lashes, as well as very natural lashes, so I was looking for something in between--and I ended up stumbling across Diamond Lash. Diamond Lash  is a very popular brand that is often associated with the models from EGG, a popular Japanese gyaru fashion magazine. After browsing through the many varieties, I decided to go with the Glamorous Eye series.

I got these from PinkyParadise for $19.99 excluding shipping and tax. As you can see, they come in a set of 5 lashes, which is a pretty good deal, considering how durable they are.


And here is a more closeup picture of the lashes. 


--

For my review, I will be considering four categories: Design, Comfort and Durability. 

Design: 5   

As you can see, these lashes are quite full, thick and voluminous. They alternate between thick lashes and a smaller criss-cross design that gradually get smaller as they go inwards towards the inner tear duct. The design is brilliant because while you have the thick lashes to give both volume and length, the alternating cross-cross hairs keep the lashes look natural enough to blend in with your own lashes. 

I love these because they are super versatile and you can pretty much use them in any look. For a gyaru or doll-eyed inspired look, you can pair them with lower false lashes. If I feel like glamming it up, I'll use these with a smokey eye. And if I just want to show off the lashes, I'll do a more minimal look paired with a bright lip, like the one I'm doing in this entry.


As you can see, when I stick these eyelashes onto my lash line, I get the triple threat of length, volume and thickness. A lot of the super thick and voluminous lashes of there can get a bit fake looking, but I feel that these lashes add just enough glamour to give your eyes that 'pop' without going overboard. 

Comfort: 4  

Upon receiving these, I was a bit intimidated by how thick the lash band was. I was afraid that the thickness of the band was going to be very uncomfortable, as I have had some bad experiences with super thick bands and eye irritation. However, while the band was thicker than, say Dolly Wink or the Darkness series, it wasn't as horrible as I expected. 

Due to the lashes being too long, I ended up having to cut the outer end of the lashes because they were poking the outer corner of my eye. After I snipped off the outermost lash and criss cross, it became a lot more comfortable. Whether you have to cut the lash band is really up to the length of your eyes and preferences. 

I've worn these out to many different occasions such as clubbing, dinner outings and even shopping. After around four to five hours, I started feeling the weight of them a bit more. 

Durability: 5  ❤ 

The great thing about the thickness of the band is how incredibly durable these lashes are! I've used the first pair many times and even after seven washes, they wear practically as good as new. They hold their shape wonderfully and are super easy to glue on and take off. 

Overall 

The quality of Diamond Lash is definitely evident in how long lasting these are. I don't imagine that I'll be running out of these anytime soon. And I'll definitely be repurchashing these when I run out. As my go-to lashes now, I must always have them ready on hand to bust out for any occasion.

--

To wrap things up, I'll add a few pictures showing off the lashes. Please don't mind the cam-whoring. 


Just a note, I'm wearing the Geo Princess Mimi Almond Brown (Bambi series).  Since it was daytime, I wanted to go for a little more natural look while still showcasing the lashes so I kept my makeup minimal. My lip color is Revlon's Lip Butter in "Sweet Tart"


I hope you all found this review helpful. I'm a huge fan of the Diamond Lash series and I'm interested in trying out some of the other series. What do you think of these lashes? Are there any other false lash brands you are going crazy over? Let me know in the comments below! 

With love, Tiffany
Sunday, March 17, 2013

Happy St. Patrick's Day: Thin Mint Pancake Recipe

Happy St. Patrick's Day! Since the holiday falls on a Sunday this year, I wonder if people are still going to wear green, go out to get piss drunk and pinch people. I know a lot of Irish people who actually celebrate the holiday are probably going to celebrate the more traditional way. But as for the rest of us non-Irish folk, what else do you really do? 

Well, to answer my own question, I won't be wearing green nor will I be getting piss drunk or pinching people. Instead, I will be gorging on these awesomely delicious Thin Mint Pancakes that I've whipped up to celebrate the occasion! How's this for a St. Patty's Day treat? 


Prep time: 10 Minutes 
Yields about: 12 pancakes 

Ingredients:

1 cup of all-purpose flour 
1 cup of milk 
1 large egg 
2 tablespoons of sugar 
2 tablespoons of vegetable oil
2 teaspoons of baking soda 
1/2 teaspoon of salt 
1/16 teaspoon of green food coloring 
Non stick cooking spray OR 1 tablespoon of butter 
8-9 thin mint cookies or mint chocolate chips 
Chocolate syrup 
Whipped Cream 

Instructions 

1. Combine the flour, milk, egg, sugar, vegetable oil, baking soda and salt into a large bowl and mix thoroughly until all lumps are gone. 

2. Add about 1/16 teaspoon of green food coloring. You can add more if you want it to be greener. Personally, I liked the batter to look more like the color of mint chocolate chip ice cream. 


3. Take the thin mint cookies into a ziplock bag and crush the cookies into crumbs. If you want the chunks bigger, don't crush them too much. If you don't have thin mint cookies lying around (it's okay if you ate them all by now), you can substitute it with Great Value: Fudge Mint Cookies, which can be found at WalMart. Or you could even use mint chocolate chips, which can be found at any big name grocery store. 


4. Combine the crushed cookies into the batter. 


5. Mix the cookies in thoroughly and evenly until the batter resembles melted mint chocolate chip ice cream. Yum! 


6. When you have your batter ready, grease a non stick pan or griddle with non-stick cooking spray for a little bit of butter. Spoon out the batter into circles onto the pan as neatly as you can. I only did two at a time since I didn't want to crowd the pan, but if you have a larger pan or make smaller pancakes, you can cook more at a time. 


7. Let the pancakes cook on the first side for about 45 seconds to a minute, depending on how hot your pan is. It won't take that long and you can use a spatula to cut between the pancakes if they stick together. 


8. Flip them over after 45 seconds to a minute. They should be light brown and slightly crispy but not too dark. Otherwise, you may have burned them and they won't look as pretty. 

9. Cook the pancakes for around another 30 seconds. You can use your spatula to peek underneath the pancake and see if it's slightly browned. 

Note: It may take shorter or longer to cook your pancakes depending on how thick or thin you make your pancakes. I like to make mine smallish to medium. The number of pancakes this recipe makes will also depend on how large or small you make your pancakes. 

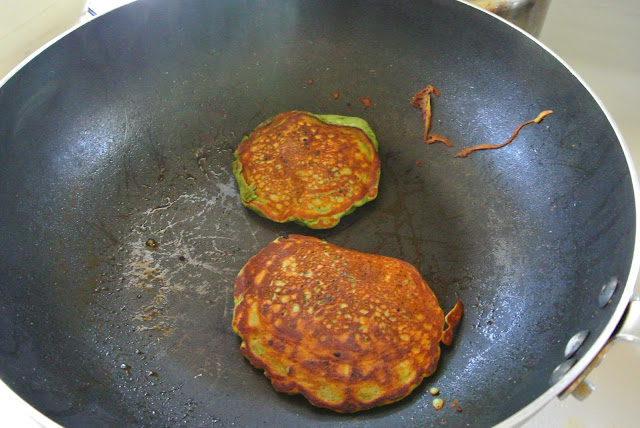
10. Let your pancakes cool a little bit. Below is a picture of how they should look. 


11. Top with a nice dollop of whipped cream and drizzle with chocolate syrup. You can use maple syrup or any other toppings that you wish. However, I find that using chocolate syrup really brings out the thin mint flavor in the pancakes. Reintroducing the chocolate into the recipe enhances the pancakes wonderfully and turns this regular breakfast food into a fun and tasty dessert. 


The finished product

Are there any other St. Patrick's Day recipes that you like to make to celebrate the holiday? I think the best thing about the holiday is the excuse to dye your food green. I don't know about you, but I love eating green colored foods that are not necessarily supposed to be green. Maybe it's just a weird quirk of mine but the sight of green colored cupcakes, cookies and drinks always make my mouth water. Anyone going to miss those Shamrock Shakes? 

Anyways, let me know if you will be trying out this recipe and what you think of it. Hopefully, you enjoy this as much as I did! 

With love, Tiffany 


Saturday, March 16, 2013

Nail Tutorial: Watermelon and Gold

Hello! I wasn't really expecting my first blog entry to be a nail tutorial, seeing that I haven't really gotten into nail polish until around six months ago. But I've been meaning to start this blog for a while now and somehow, writing about my nails of the week just seems right.

My friend is having a birthday party in Los Angeles at a club this weekend and I was inspired by one of my high waisted skirts which also happens to be hot pink. To match this skirt, I always break out my light gold heels since the colors complement each other beautifully. And so, my nails have taken on the form of my outfit this weekend. 


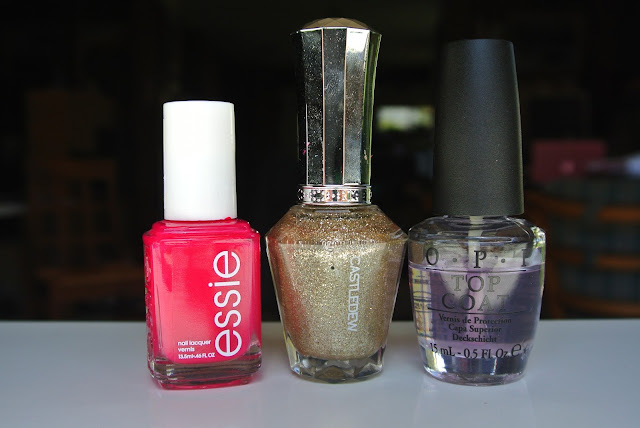
To create this look, I used three nail polishes. 


Essie's "Watermelon", Castledew's "9845", and OPI's "OPI Top Coat"


Just like the name suggests, "Watermelon" is a bright, juicy hot pink, similar to that of a watermelon. Although Essie's website states that it's a "creamy and refreshing, juicy red", it definitely veers a lot closer to pink on the color spectrum. 


Castledew is a Korean brand and I got "9845" a while ago in Korea. I apologize in advance that you may not be able to find this nail polish easily in the US, but Essie's "Beyond Cozy"is pretty close to it in terms of color. "9845" can be described as a cool, light silvery gold and is very glittery and grainy. I'm not quite sure if "Beyond Cozy" would go on smoother but color-wise, it's a pretty good match. 


I painted all of my nails with "Watermelon" in two layers, except for the forefinger, which I've painted with "9845" in three layers. I also applied the top coat afterwards. It's pretty self explanatory at this point. However, I decided to take it up a notch by adding a small gold cross onto my index finger. 


To make the cross, I used masking tape and a pair of scissors. You can use any kind of tape you want. In hindsight, I should've used scotch tape, since it's stickier and has better staying power, but I didn't have any lying around. 


I took "9845" and painted a small section of the tape in three layers. You can do two to three layers depending on how thick you want it to be. After it dries, cut the section into small, thin pieces or into whatever shapes you want. 


Stick the sectioned pieces to your nails according to how you want. After you have the pieces positioned the way you want, use the scissors to cut them as close to the edge of your nail as possible, making sure that the pieces don't stick out. And to further secure the pieces, paint a layer of top coat over it. 

You can make stripes, criss-crosses or use one of the strips per finger to separate the nail and the tip to make a cool French tip as well. I think another super cute idea would've been to cut a small gold heart and stick it onto one of my nails. Hmm, perhaps I'll do that next time.


And here's one more shot of the finished look.


I love painting my forefinger in a different color to contrast against the rest of my nails. My go-to color so far has been "9845", just because it matches wonderfully with pinks and pastels. I just think it adds a cool and fashionable dimension to your typical, uniformly painted nails. Most of my guy friends have told me that they don't really get the whole painting-your-forefinger-a-different-color. But who really cares? I guess this is one of the beauty trends that guys won't really get such as orange lipstick or brightly colored eyeliner. What do you think? Let me know in the comment box below! 

With love, Tiffany